A liquid limit test of soil is done to get the information on fine-grain soil (cohesive soil) about the consolidation properties of soil while calculating allowable bearing capacity & settlement of the foundation.
The liquid limit of soil is the minimum water content at which the soil is still in the liquid state but has a small shearing strength against the flow.
From the test point of view, the liquid limit of soil can be defined as:
“Liquid limit of soil is the minimum water content at which a pat of soil cut by a groove of standard dimension will flow together for a distance of 12 mm under an impact of 25 blows in the apparatus(either Casagrande or Cone Penetrometer.).”
1. Purposes of Liquid Limit Test
a. To get the information on fine-grain soil (cohesive soil) about the consolidation properties.
b. To identify the nature of the soil.
2. Types of Liquid Limit Test of Soil
There are two ways of determining the liquid limit of soil. They are:
a. Liquid limit test utilizing Casagrande apparatus
b. Liquid limit test utilizing Cone Penetrometer apparatus
a. Liquid Limit Test Utilizing Casagrande Apparatus
This test is also called Casagrande Test because of the use of the Casagrande apparatus.

Apparatus Required
1. Casagrande’s liquid limit device
2. Grooving tools of both standard and ASTM types
3. Oven
4. Evaporating dish or glass sheet
5. Spatula
6. 425 micron IS sieve
7. Weighing balance having an accuracy of 0.01gm.
8. Wash bottle.
Procedure
~ Casagrande’s liquid limit device is used for determining the liquid limit. Setup the device by adjusting the drop of the cup utilizing screws. The drop height should be exactly 1 cm.
~ Take a soil sample passing through the sieve of 0.425 mm sieve. Generally. 120 gm of sample is used for the test.
~ Make a paste of soil using distilled water. Mixing should be done for about 15-30 minutes until a uniform mix is obtained.
~ The mix is placed under humid conditions to get uniform moisture distribution.
~ Place the mixture on the metal brass cup and level horizontally using a knife or spatula.
~ Divide the soil into two portions using the grooving tool.
~ Rotate the liquid limit device at two revolutions per second.
~ Record the number of blows (N) to close the bottom of the groove through a distance of 12 mm.
~ Determine the water content (W) using the oven drying method.
~ Water content at 25 no. of blows is the liquid limit value.
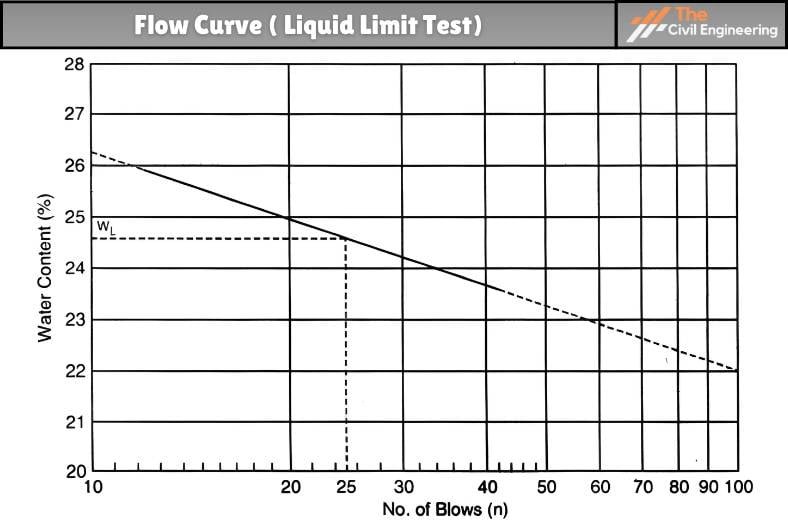
~ Draw the flow curve between log N and W; determine the liquid limit corresponding to N=25.
~ The test should be done at least three times.
Datasheet for Liquid Limit Test
| Sl. No. | Observations and Calculations | Determination No. | ||
| 1 | 2 | 3 | ||
| Observation | ||||
| 1 | Number of blows (N) | |||
| 2 | Water content can No. | |||
| 3 | Mass of empty can (M1) | |||
| 4 | Mass of can + wet soil (M2) | |||
| 5 | Mass of can + dry soil (M3) | |||
| Calculations | ||||
| 6 | Mass of water = M2 – M3 | |||
| 7 | Mass of dry soil = M3 – M1 | |||
| 8 | Water content = w = [(6) / (7)] x 100 | |||
Result of Liquid Limit Test
Draw a flow curve between log N and w.

Liquid limit (for N=25) =
b. Liquid limit test utilizing Cone Penetrometer apparatus( IS-2720-PART-5-1985 )
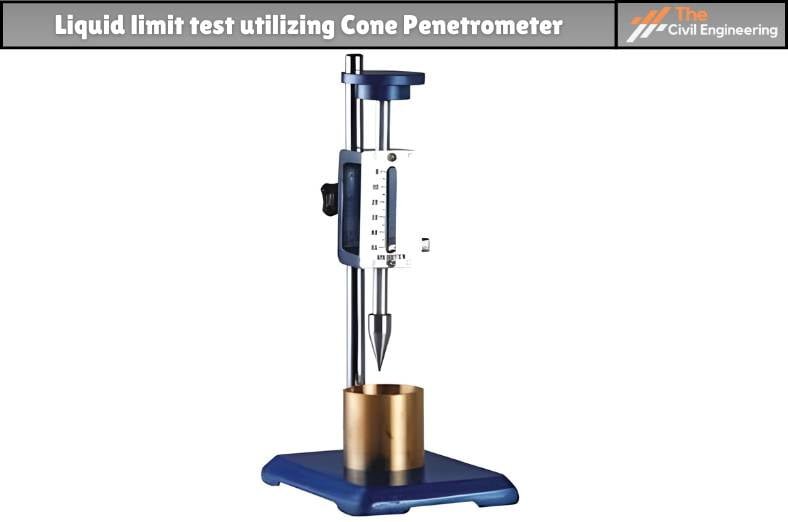
It is the second method of determining the liquid limit test of soil. This test utilizes a cone penetrometer for the test.

Apparatus Required
a. Sieve of 425-micron
b. Oven
c. Weighing balance with the accuracy of o.01 gm
d. Cone penetrometer
Sample Preparation
Present molds in the soil sample are broken utilizing a wooden mallet. Soil passing through the 425-micron sieve is taken and dried in an oven at 60 deg. Celcius.
Procedure
a. 150gm of prepared sample is taken.
b. Uniform paste of sample is made by adding distilled water.
c. The prepared paste is then transferred to the cylindrical cup of the cone penetrometer apparatus. Air should not be trapped in this process.
d. The paste is leveled up to the top of the cup and placed on the base of the cone penetrometer apparatus.
e. The cone penetrometer is adjusted so that the cone point touches the surface of the soil paste in the cup. Then, the initial reading is taken.
f. Release the vertical clamp allowing the cone to penetrate soil paste under its weight for 5 seconds. Note the nearest millimeter after 5 sec.
g. The test is repeated four times. Penetration should be in the range of 14 to 28 mm.
h. Determine the moisture content of each trial.
Calculation
Plot a graph between water content on Y-axis and the cone penetration on X-axis.
The liquid limit value is the moisture content corresponding to cone penetration of 20 mm.
Result
Liquid limit value(at 20 mm penetration) =
3. Advantages of Liquid Limit Test
a. It helps to determine the water content present in the soil.
b. It helps to predict the bearing capacity of the soil.
c. It helps to know the permeability of the soil.
4. Precautions in Liquid Limit Test
a. Mixture of soil and water should be mixed appropriately and should not contain excessive moisture.
b. Mixture should be handled properly.
| Read Also: Softening Point Test of Bitumen |

