1. Introduction
Soil can be regarded as the structural basis of any type of construction as the majority of the structures are erected on the soil itself. In this regard, soil can be considered as the foundation of all types of surface construction. Soil should have an acceptable quality to ensure adequate structural strength and safety. Thus, to ensure the quality of the soil, various tests are conducted. One such test of soil is the plastic limit test.
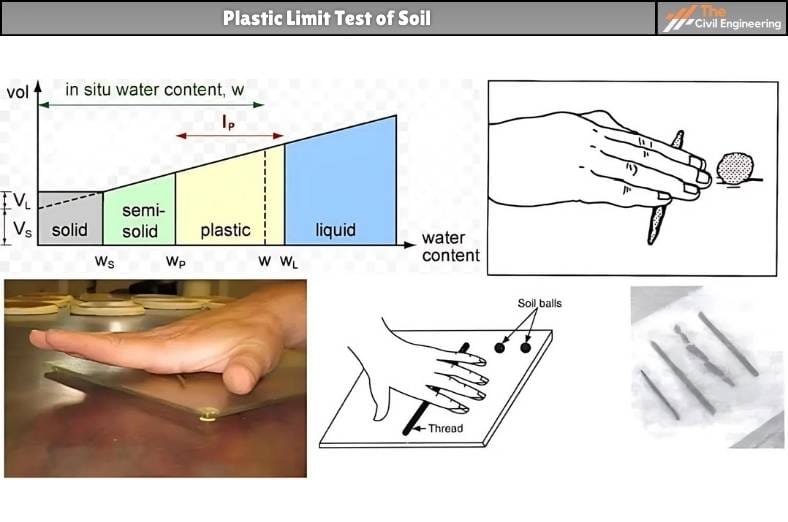
The plastic limit of soil can be defined as the water content at which the soil begins to crumble when rolled into threads of the specified size.

In other words, the plastic limit may be defined as the moisture content where the thread of soil breaks apart at a diameter of 3.2 mm (about 1/8 inch).
In this regard, the soil is considered non-plastic if the soil thread cannot be rolled down to 3.2 mm at any possible moisture conditions.
2. Importance of Plastic Limit Test of Soil
The main importance of the plastic limit test of soil can be summarized as follows:
1. The value of the plastic limit is used to classify the fine-grained soils and evaluating the activities of clayey soil.
2. It indicates the toughness index of soil.
3. It gives an idea regarding the consistency of soil.
4. It can be used to predict the consolidation properties of soil while computing the settlement and bearing capacity of the soil.
5. The plastic limit is essential to ascertain the plasticity index of the soil.
3. General Test Procedure of Plastic Limit Test
The general test procedure of the plastic limit test has been briefly explained below.
a. Objective
To determine the plastic limit of the given soil sample.
b. Apparatus Required
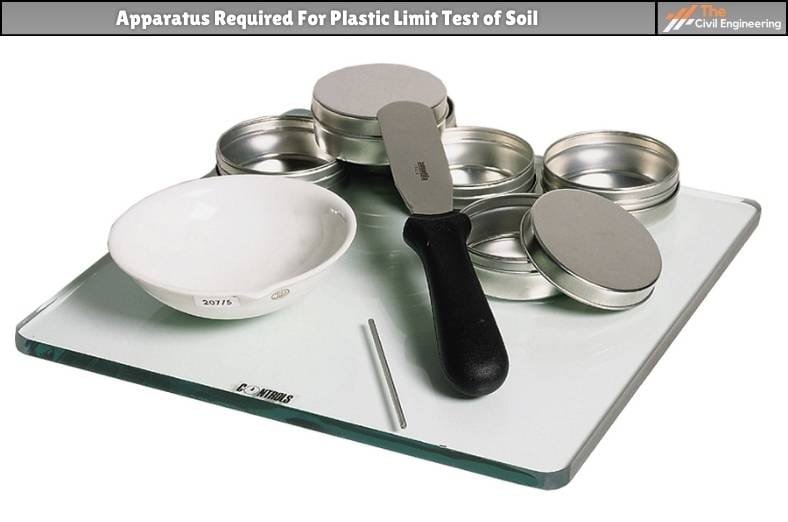
The apparatus required for conducting the test can be listed as follows:

1. Ground Glass Plate: The ground glass plate having 30 cm (12 in.) sides and is square in shape with a thickness of 1 cm.
2. A drying oven.
3. Spatula or a Pill knife that consists of a blade of about 2cm width and 10 to 13 cm long.
4. A metallic rod having a diameter of 3.2mm and 100mm long.
5. Containers.
6. Weighing Balance with an accuracy of 0.01gm.
7. Plastic Limit Rolling Device (optional)
c. Procedure
The test procedure of the plastic limit test of soil includes the following series of steps:
1. Preparation of the Soil Sample:
The preparation of the soil sample includes the following listed steps:
a. About 20gm (minimum) of the soil is taken which is selected from the soil prepared for the liquid limit test.
b. The water content of the soil taken is then reduced to a consistency such that it can be rolled easily without the soil sticking on the hands by spreading or by mixing the soil continuously on the glass plate or in the mixing dish.
2. After the sample of soil has dried properly, about 1.5 to 2.0gm of the soil specimen from the prepared plastic limit specimen is taken.
3. The taken soil sample is then molded into an ellipsoidal mass.
4. The soil mass is then duly rolled. The rolling of the soil mass can be done by any of the following methods:
a. Hand Rolling Method:
In the hand-rolling method, the rolling of the soil mass is done manually by hand.
The soil mass is rolled between the palm or fingers and the ground-glass plate with just sufficient pressure to ensure that the mass is rolled into a thread of uniform diameter throughout its length.
The thread is then further deformed on each stroke such that the diameter of the soil thread reaches 3.2mm.
In general, about 80-90 strokes per minute is sufficient.
One complete motion of the hand forward and back to the starting position is regarded as one stroke count.
b. Rolling Device Method:
In this method of rolling, a smooth unglazed paper is attached to both the top and bottom plates of the plastic limit rolling device. Then, the soil mass is placed on the bottom plate at the midpoint between the slide rails of the device.
The top plate is placed in contact with the soil mass.
A gentle downward force is then applied simultaneously and back and forth motion is applied to the top plate so that the top plate comes into contact with the side rails of the device within 2 minutes.
It must be taken care that during the rolling process, the end of the thread of soil must not contact the side rail.
5. The soil thread is rolled continuously until the diameter of the thread is 3.2 mm.
Then, the soil thread is broken into several slices and the slices are squeezed together, kneaded between the thumb and first finger of each hand, reformed into an ellipsoidal mass, and finally re-rolled.
This process is continued until the thread crumbles and the soil can no longer be rolled into a 3.2-mm diameter thread.
6. Then, the pieces of the crumbled thread are collected together and placed in a container of known mass. The container must be covered immediately.
7. Again, another 1.5 to 2.0gm of the prepared soil from the specimen is taken and the process up to step 3 is repeated until the container has at least 6gm of soil sample.
Then, the remaining steps are repeated to make another container that contains at least 6gm of the soil sample.
8. Finally, the water content of the soil contained in the containers is determined.
d. Calculation
Calculate the average of the two water contents (trial plastic limits) and round to the nearest whole number; this value is the plastic limit, PL.
The test shall be repeated if unless the difference between the two trial plastic limits is smaller than repeating the test if the difference between the two trial plastic limits is greater than the acceptable range for two results that is, 1.4 percentage points.
Table 1 Data Sheet for Plastic Limit Test
| Sl. No. | Observations and Calculations | Determination No. | ||
| 1 | 2 | 3 | ||
| Observation | ||||
| 1 | Moisture content container number | |||
| 2 | Mass of empty container (M1) | |||
| 3 | Mass of container + wet soil (M2) | |||
| 4 | Mass of container + dry soil (M3) | |||
| Calculations | ||||
| 5 | Mass of water = M2 – M3 | |||
| 6 | Mass of dry soil = M3 – M1 | |||
| 7 | Water content = w = [(5) / (6)] x 100 | |||
e. Result
Plastic limit of the soil = _____%
4. Precautions To Be Taken
a. While performing the experiment, temperatures should be maintained to prevent fast dryness of the soil.
b. Soil should contain a sufficient amount of water to be fresh and should show the plastic state(soil in liquid state with viscous nature) when molded in different shapes.
c. Soil should be free from dirt particles.
d. For each time, fresh soil should be used to test.
e. The hardness of water may differ soil freshment. Thus, distilled water can be used.
| Read More: Liquid Limit Test |
| Read More: Prismatic Compass |

